Eggnog Ice-Cream (Sous-Vide)
About this time last year, my daughter was introduced to Eggnog. To her, it was like "where have you been all my life". She most certainly has an infatuation with this heavenly drink (unspiked of course) and you could say it was love at first taste. Anyhow she asked me to make an Ice-Cream version a few months ago and I was very happy to oblige ( I love challenges). The first thing I did was google and search my books for an Eggnog Ice-Cream version. I saw several that were labeled Gelato and Ice-Cream. The majority of them were really different from each other. What to do? So many to choose from.
 I decided to buy several (I think there were 4) Eggnog varients and taste for myself knowing full well that my daughter would be happy to drink the remaining amount. I am happy to report that no Eggnog was wasted. Contrasting several versions and attempting to unravel the nuances of each was not difficult. I tasted all the store-bought versions side by side and took notes. With notes in hand, my daughter and I set out on our quest to make a Kick-Ass Ice-Cream. I made a couple versions until we dialed in what we thought was an awesome interpretation of an Eggnog Ice-Cream.
Before we proceed as most of you know I Sous-Vide Process my Ice-Cream Base. I have been using 150f for 2 hours but after doing some research and using science as my reference I've decided to use 162℉ for about 70-80-Minutes. It takes about 35-40 minutes for the base to reach 160℉ (I used a probe) and the additional time is to pasteurize and cook the proteins. Pastueration at 160f takes less than 10 secs. From what I have read holding 162℉ for about 25-30 minutes improves the overall texture because of the denaturation of proteins and their ability to hold on to more water. Think about it for a moment... the more water that binds to the protein means smaller ice crystals. This also improves whey protein foaming and emulsification. What does that mean? Simply means with the foam formation improves texture and helps the Ice-Cream hold on to air that increased during the churning which we know is overrun. With this T&T, all the planets line up (smoother & less icy) and the denatured proteins give the Ice-Cream ample Foam which improves the air retention and the emulsification of all the proteins. What's really cool IMO about Sous-Vide-Processed Ice-Cream is the evaporation is literally reduced to zero. Traditional heating methods can over thicken the custard base through evaporation and I think with the SV version you get the thickness without worrying too much about water evaporation. It's almost idiot-proof. Of course if you SV-Process to long it will get too thick. I need to recheck the Time to Temp but I believe it was about 35-Minutes to get to 160f maybe another 10-12 min to get to 162f. So with that, all you need is 70-80 Total Minutes. Getting it to 160℉/162℉, of course, is based on the overall volume of the base.
 The use of Lyles Golden Syrup is another new addition (optional). Golden syrup is an inverted sugar and when added in small amounts to the Ice-Cream could be a game-changer. The addition of the inverted sugar which is less sweet than sucrose will ensure less of the water will form into ice. The Ice-Cream will be softer when frozen, smoother, and creamier. The percentage to use is roughly 20% of the sugar used. So in other words, if your recipes call for 200g fo sugar use 40 g of the syrup (Total 240g).


 This is not unlike all my other Ice-Creams. So very easy to make if you have a scale and a tare feature. Having an excellent mixer like a Vitamix makes this a snap to put together.
Lets first get all the ingredients together.
Using the Tare feature measure out in one bowl the following. Skin-milk-Powder, 47 grams of sugar, Avacream, and Salt and set aside.
Using your Vitamix (or mixer) and heavy-duty scale (with Tare feature), measure out the Milk, Cream, and Golden Syrup. Add to the container the Extracts, Rum, Nutmeg, and Cinnamon. Note: do not add whole cloves yet. Don't forget to run the mixer on low for a few seconds to combine.


Add 4-Yolks to a bowl with 100g of sugar and whip until the ribbon stage.
 To the container, add the Whipped Eggs, Run the Vitamix until thoroughly combined. Give it a taste. Add to the Vitamix in increments the bowl containing the Skinmilk Powder, Avacream, and salt. Run the mixer until thoroughly combined.


Place a large Vaccum Bag into a 1-gallon pitcher folding over edges for stability and poured the contents of the container into the bag. Add the whole cloves. SV-Process for 80-90-Minutes at 162℉. The stovetop method works too.


Strain out the custard base making sure to remove the cloves using a sieve or chinois. After shocking refrigerate at least 6-hours. I prefer 24 hours.


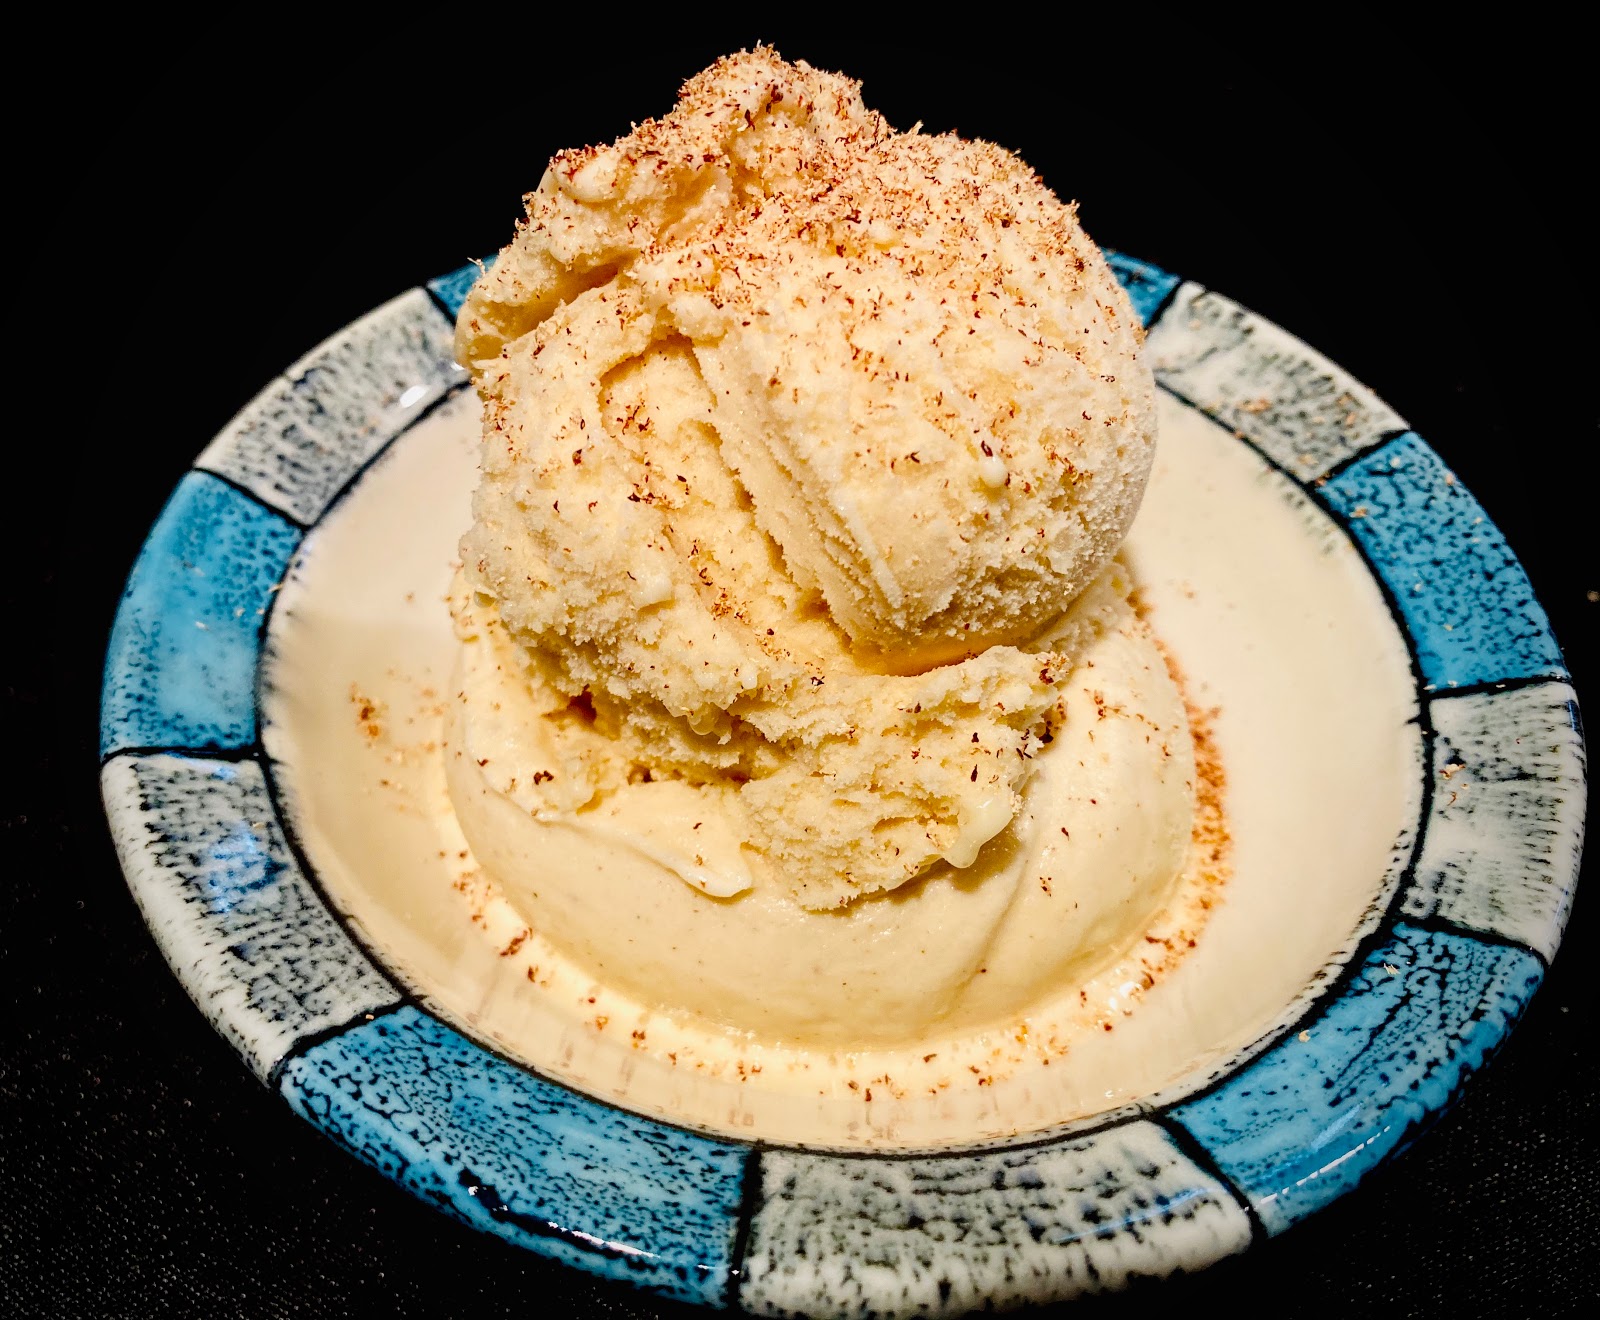
 Freshly grated Nutmeg on top.....
Using your Vitamix (or mixer) and heavy-duty scale (with Tare feature), measure out the Milk, Cream, and Golden Syrup. Add to the container the Extracts, Rum, Nutmeg, and Cinnamon. Note: do not add whole cloves yet. Don't forget to run the mixer on low for a few seconds to combine.


Add 4-Yolks to a bowl with 100g of sugar and whip until the ribbon stage.
 To the container, add the Whipped Eggs, Run the Vitamix until thoroughly combined. Give it a taste. Add to the Vitamix in increments the bowl containing the Skinmilk Powder, Avacream, and salt. Run the mixer until thoroughly combined.

Place a large Vaccum Bag into a 1-gallon pitcher folding over edges for stability and poured the contents of the container into the bag. Add the whole cloves. SV-Process for 80-90-Minutes at 162℉. The stovetop method works too.


Strain out the custard base making sure to remove the cloves using a sieve or chinois. After shocking refrigerate at least 6-hours. I prefer 24 hours.


Amazing!!!!!!!
Comments
Post a Comment